After creating your Npati account and completing your profile, the next important step is to add your address.
Your saved address is used when you create marketplace listings. Once you add it to your Npati account, you do not need to enter the same address every time you create a new listing. Npati can automatically use your saved address during the listing creation process.
An address is required to create listings on Npati, so completing this step is important if you plan to sell items on the marketplace.
In this guide, you will learn how to open Npati Settings, add a new address, choose your default address and verify your email account.
Before You Add an Address
If you are completely new to Npati, we recommend completing the first two account setup steps before continuing.
First, read How to Create a Npati Account to learn how to register with your email address or Google account.
After registration, read How to Set Up Your Npati Profile to add your profile photo, username, location, bio, profile links and interest tags.
Once those steps are complete, you can continue with your account settings and saved address.
This creates a simple setup process:
Create your account → Complete your profile → Add your address → Create your first listing
Open Your Npati Settings
After signing in, open the Settings page for your Npati market.
United States:https://www.npati.com/settings
Canada:https://www.npati.com/ca/settings
United Kingdom:https://www.npati.com/gb/settings
The account settings and address management process work the same way across these Npati markets. The main difference is the regional URL you use.
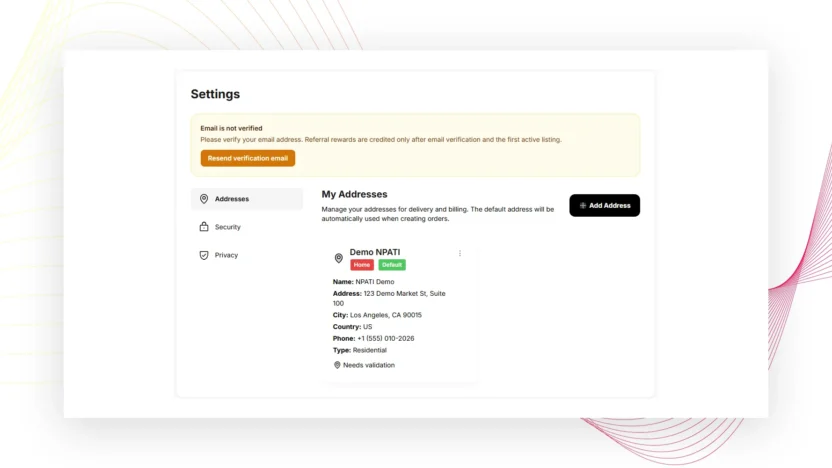
From the Settings page, you can manage important account information, including your saved address and email verification status.
How to Add a New Address to Npati
On the Settings page, find the address section and select:
Add Address
Npati will open the Add New Address form.
Complete the required information and save your address.
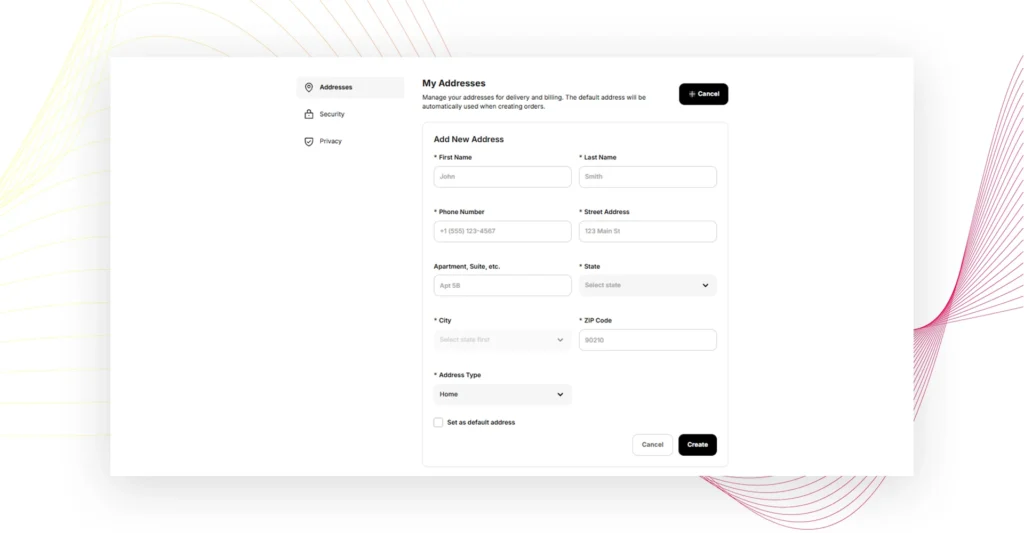
First Name
Enter your first name in the First Name field.
This is a required field.
Use the name associated with the person using this address.
Last Name
Enter your last name.
The Last Name field is also required.
Make sure the information is entered correctly before continuing.
Phone Number
Enter your phone number in the Phone Number field.
For example, a United States phone number may use the +1 country code.
Use a phone number that is current and accessible to you.
Street Address
Enter your main street address in the Street Address field.
Make sure the street information is accurate.
This saved address can later be used when you create listings, so checking the information now can save you from correcting it repeatedly later.
Apartment, Suite, etc.
If your address includes an apartment, unit, suite or similar additional information, you can enter it in:
Apartment, Suite, etc.
If this does not apply to your address, you can leave the field empty.
Select Your State
Next, select your State.
Choose the correct state from the available list.
For the United States version of Npati, this will correspond to the US state connected to your address.
The appropriate regional options are displayed for the Npati market you are using.
Select Your City
After choosing your state, select your City.
You may see:
Select state first
until a state has been selected.
Choose the state first, then select the appropriate city from the available options.
This helps Npati associate your address and future marketplace listings with the correct location.
Enter Your ZIP Code
Enter your ZIP Code in the required field.
For US users, use the ZIP Code connected to the address you entered.
Users in other Npati markets should enter the appropriate postal information requested by their regional version of the platform.
Choose an Address Type
Npati lets you select an Address Type.
For example:
Home
Choose the address type that best describes the address you are saving.
Set as Default Address
You can also choose:
Set as default address
This is useful if this is the address you normally want to use when creating marketplace listings.
Setting a default address means Npati can automatically use it during relevant marketplace actions instead of requiring you to enter the same information again.
For most users with one primary address, setting it as the default is the easiest option.
Save Your Address
After checking all the information, select Create.
Your new address will be saved to your Npati account.
If you do not want to save the information, select Cancel.
Before selecting Create, check your first name, last name, phone number, street address, state, city and ZIP Code for mistakes.
Why You Should Add Your Address Before Creating a Listing
A saved address is an important part of the Npati listing process.
Without an address added to your account, you will not be able to create a marketplace listing.
This is why we recommend adding your address during your initial account setup.
Once the address has been saved, Npati can automatically use the information when you start creating listings.
You only need to add the address once.
Instead of repeatedly entering your location information for every new marketplace listing, your saved address can be selected or applied automatically during the listing creation process.
This makes posting items faster, especially if you plan to create multiple listings.
Why Location Matters on a Local Marketplace
Npati is designed to help people discover marketplace listings and connect with buyers and sellers.
Location information is particularly important for local buying and selling.
A correctly configured address helps associate your listings with the relevant geographic area and makes the listing creation process easier.
For sellers in the United States, this can include information such as your state, city and ZIP Code.
Canada and the United Kingdom use their corresponding regional versions of Npati, while the account setup process remains similar.
Verify Your Email Address
The Settings page also shows whether your email address has been verified.
If your account is not verified, you may see:
Email is not verified
and the following message:
Please verify your email address. Referral rewards are credited only after email verification and the first active listing.
You will also see:
Resend verification email
If your email has not been verified yet, select Resend verification email.
Npati will send another verification message to the email address associated with your account.
Open your email inbox and follow the verification instructions.
If you do not see the message, also check your spam or junk folder.
Why Email Verification Is Important
Email verification confirms that you have access to the email address connected to your Npati account.
It is a useful part of completing your account setup.
Email verification is also important for the Npati referral system.
Referral rewards are credited only after:
- The email address is verified.
- The user has their first active listing.
If you plan to use Npati regularly, verify your email early instead of waiting until you need a particular account feature.
Video: How to Add an Address to Npati
Watch this video to see how to add and save an address in Npati Settings.
The video will show how to open Settings, select Add Address, complete the required fields, choose your state and city, set your default address and save it.
It will also show where to check your email verification status and how to resend a verification email if your account has not been verified.
Npati Settings for USA, Canada and the United Kingdom
Npati uses separate regional URLs for its English language marketplaces.
Use the Settings page that corresponds to your market:
USA:https://www.npati.com/settings
Canada:https://www.npati.com/ca/settings
United Kingdom:https://www.npati.com/gb/settings
The basic account settings and address creation workflow are the same.
You do not need separate instructions for each market. Simply open the correct regional version of Npati and follow the same steps.
What Happens After You Save Your Address?
Once your address has been added successfully, your account is one step closer to being ready for marketplace selling.
When you begin creating a new listing, Npati can use the address information you already saved.
This means you do not need to type your full address every time you post another item.
For users who regularly create classified listings or sell multiple items locally, saving the address once makes the process much faster.
Your next step is to create your first marketplace listing.
Recommended Npati Account Setup Order
For a new Npati user, we recommend completing your account in this order:
Step 1: Create your Npati account
Register using your username, email and password or continue with Google.
Read: How to Create a Npati Account
Step 2: Complete your Npati profile
Add your profile photo, username, profile title, location, bio, profile links and interest tags.
Read: How to Set Up Your Npati Profile
Step 3: Add your address
Open Npati Settings, add your address and set your primary address as the default.
Step 4: Verify your email
If your email is not verified, resend the verification email and complete the verification process.
Step 5: Create your first listing
Once your address has been saved, you can continue to the listing creation process.
This gives new users a clear path from registration to becoming an active Npati marketplace seller.
Frequently Asked Questions About Npati Addresses and Settings
Where can I add my address on Npati?
Open the Settings page for your market.
USA:
https://www.npati.com/settings
Canada:
https://www.npati.com/ca/settings
United Kingdom:
https://www.npati.com/gb/settings
Then select Add Address.
What information do I need to add an address?
The address form includes fields for your first name, last name, phone number, street address, optional apartment or suite information, state, city, ZIP Code and address type.
Do I need an address to create a Npati listing?
Yes. You need to add an address to your account before you can create marketplace listings.
Do I need to enter my address every time I create a listing?
No. Once your address has been saved, Npati can automatically use your saved address during the listing creation process.
This means you can add it once and reuse it for future listings.
Should I set my address as the default?
If this is the address you normally use for your marketplace activity, setting it as your default address makes the listing creation process more convenient.
How do I verify my Npati email?
Open your Npati Settings page.
If you see Email is not verified, select Resend verification email.
Open the verification email sent to your inbox and follow the instructions.
Why should I verify my email?
Email verification confirms access to your email account and is also required for referral rewards.
Referral rewards are credited only after email verification and the first active listing.
Are the Settings pages different in the USA, Canada and the UK?
The regional URLs are different, but the basic Settings and address management workflow is the same.
Use the Npati URL for your country and follow the same steps.
Add Your Address and Get Ready to Create a Listing
Adding your address is an important part of preparing your Npati account for marketplace selling.
Open the Settings page for your market, select Add Address, enter the required information and choose your default address.
You only need to save your address once. After that, Npati can automatically use the saved information when you create marketplace listings.
While you are in Settings, check your email verification status as well. If your email is not verified, resend the verification email and complete the verification process.
If you are still setting up your account, read How to Create a Npati Account first, then continue with How to Set Up Your Npati Profile.
Once your account, profile, address and email verification are ready, the next step is to create your first Npati listing.