Creating a listing on Npati gives you several ways to present an item, product or post to other users.
You can create a traditional marketplace listing with photos and a price, combine photos with video, publish a video focused listing, offer an item for free, or create a post without a price or Buy Now option.
Npati also lets you add product sizes, label individual photos by color, select a saved address and add tags to help users find your listing.
The listing creation process works the same across the United States, Canada and the United Kingdom. The main differences are the regional URL, currency, available categories and location options.
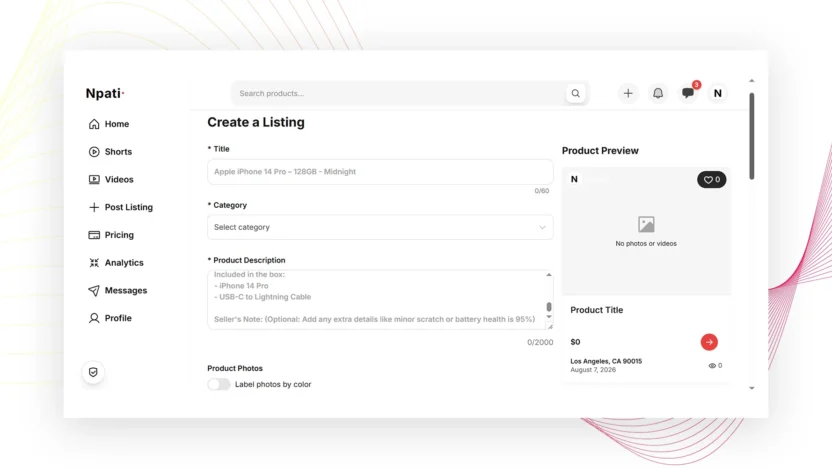
This guide explains each part of the Create a Listing page step by step.
Before You Create Your First Listing
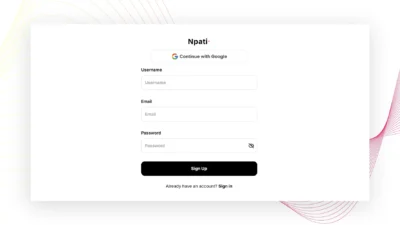
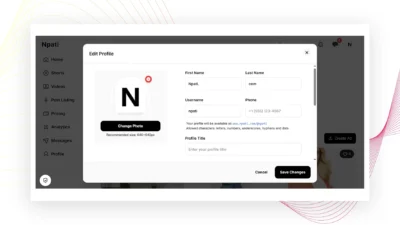
If you are new to Npati, we recommend completing your account setup first.
Start with these guides:
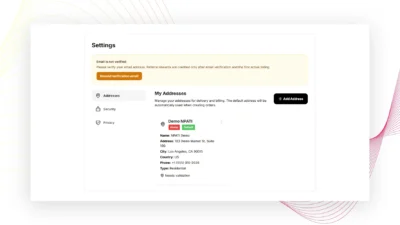
An address is especially important because you need a saved address before you can create a marketplace listing.
Once you have added your address, Npati can automatically use it when you create future listings.
Open the Create a Listing Page
Use the listing creation page for your Npati market.
United States:https://www.npati.com/create-product
Canada:https://www.npati.com/ca/create-product
United Kingdom:https://www.npati.com/gb/create-product
The listing form works in the same way across these markets.
However, categories, location options and currency can be different depending on the country you are using.
For example, the US version uses USD pricing, while regional versions use the appropriate marketplace settings for that country.
Add Your Listing Title
The first required field is:
Title
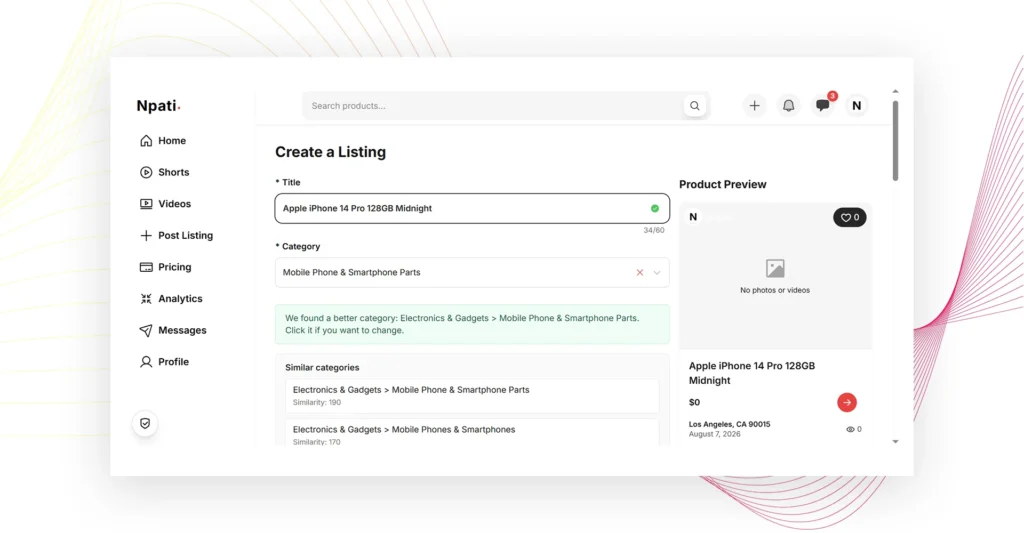
Your title can contain up to 60 characters.
A good marketplace listing title should quickly tell the buyer what you are offering.
For example:
Apple iPhone 14 Pro 128GB Midnight
A useful title normally includes important information such as:
- Brand
- Product name
- Model
- Size or capacity
- Important variant
- Condition when useful
Avoid filling the title with unrelated keywords.
A clear title is easier for buyers to understand and can also help your listing appear for relevant marketplace searches.
Choose the Correct Category
The next required field is:
Category
Npati can automatically suggest a category based on the information entered in your Title.
This can save time when creating a listing.
However, you should always check the suggested category before publishing.
Npati has many marketplace categories, and an automatic suggestion may occasionally choose a category that is not the best match for your product.
For example, if you enter a specific electronics model, Npati may suggest an electronics category automatically. Before creating the listing, confirm that the selected category accurately describes your item.
The available categories may differ between the USA, Canada and United Kingdom marketplaces.
Choosing the correct category is important because it helps users discover your listing while browsing Npati.
Write Your Product Description
The Product Description field allows up to 2,000 characters.
Use this section to explain what you are selling clearly.
A useful description can include:
- Product name
- Condition
- Main features
- Age of the item
- Included accessories
- Measurements
- Storage capacity
- Technical specifications
- Known scratches or damage
- Other information a buyer should know
For example, an iPhone listing might include information about the display, storage, camera, battery health and accessories included with the device.
A simple structure works well:
Key Features
Explain the most important characteristics of the item.
Included
List anything included with the product.
Condition
Clearly explain whether the item is new, used or has visible wear.
Seller’s Note
Add any additional information a buyer may want to know.
Good marketplace descriptions should be accurate and easy to read.
Do not hide important defects. Clear information can reduce unnecessary questions and help buyers decide whether the item is right for them.
Add Product Photos
The Product Photos section lets you upload images of your item.
Supported formats include:
PNG
JPG
GIF
WEBP
Npati automatically optimizes uploaded images for faster loading.
A Npati listing can include up to 6 product photos.
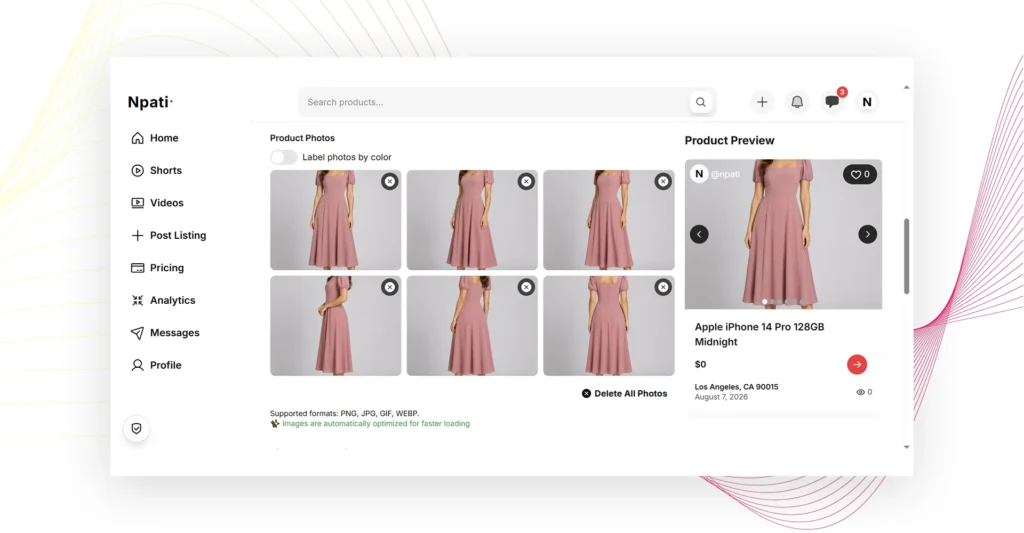
To upload them, drag the images into the upload area or click to select files from your device.
For best results, show the product from several useful angles.
For most physical products, try to show several useful angles.
For example:
- Front
- Back
- Side
- Important details
- Accessories
- Any scratches or damage
Real and clear photos usually provide more useful information than repeatedly showing the same angle.
Label Photos by Color
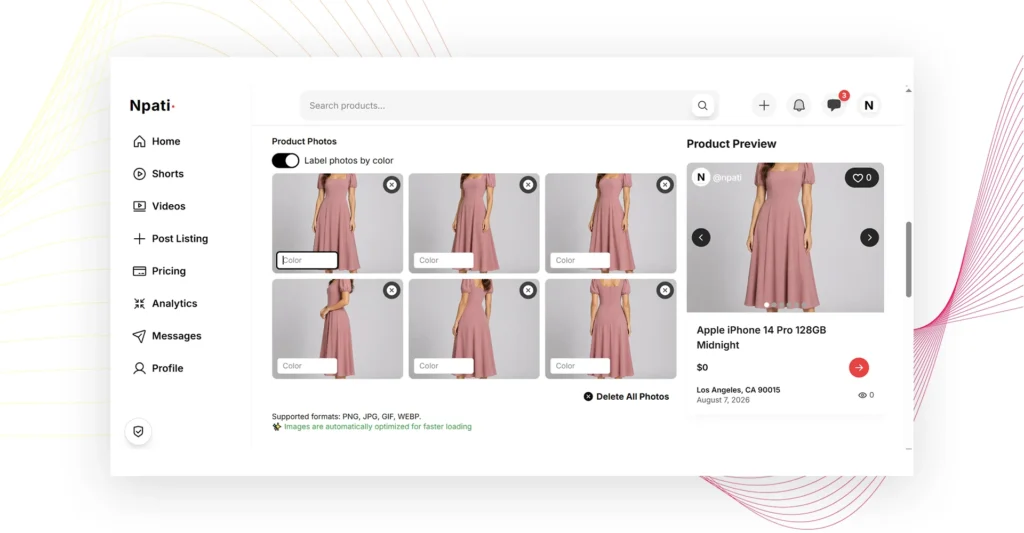
Next to the photo upload section, you can enable:
Label photos by color
When this option is enabled, additional color information becomes available for your uploaded photos.
You can specify the color of the product shown in each image.
This is useful when the same listing shows several color options.
For example, if you are listing shoes available in black, white and blue, you can associate the appropriate color with the corresponding images.
The feature makes it easier to organize product photos when color is important to the listing.
Add a Video to Your Listing
Npati listings can also include video.
In the Video & Thumbnail section, you can upload a video up to:
2 GB
Video can be useful when a product is easier to understand through movement or demonstration.
For example, you can use video to show:
- An electronic device working
- A vehicle running
- Furniture from different angles
- The condition of a used product
- Product features
- Clothing or shoes in more detail
This gives buyers another way to inspect an item before contacting you.
Three Ways to Present a Listing
Npati gives you flexibility in how you create your marketplace card.
Option 1: Photos Only
You can create a normal listing using up to six product photos.
This works well for items that can be clearly shown with images.
Option 2: Photos, Video and Thumbnail
You can upload up to six photos and also add a video.
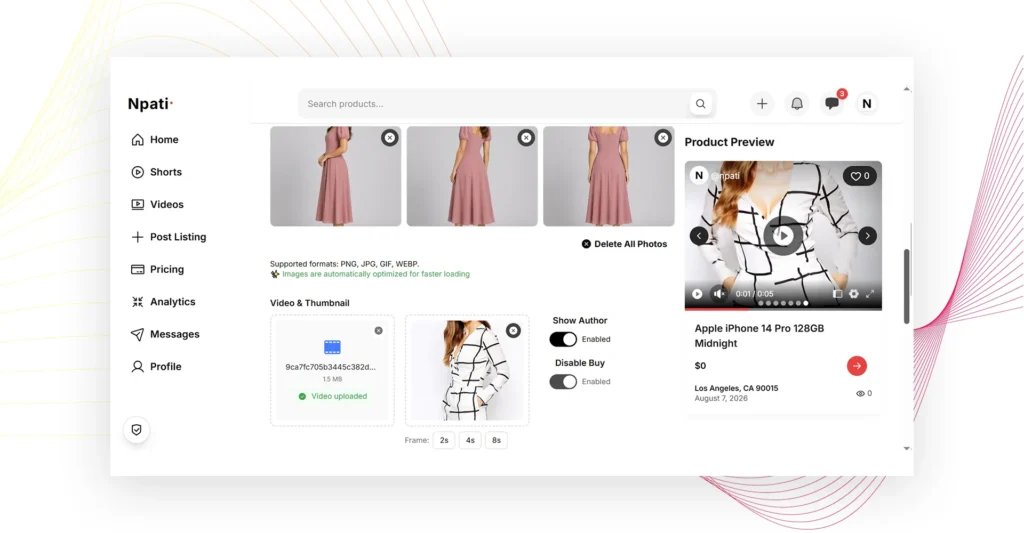
In this format, the listing can include your product images together with the video and its thumbnail.
This is useful when you want a detailed marketplace listing with both traditional photos and video content.
Option 3: Video Focused Listing
You can also create a listing using only a video without uploading the six standard product photos.
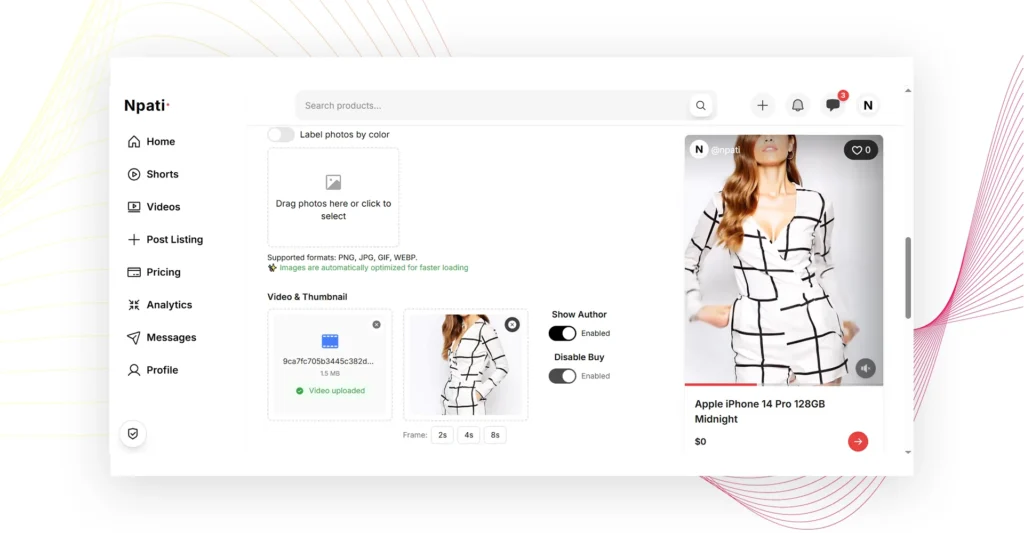
When you upload the video, Npati automatically creates a thumbnail from it.
In this mode, the video based card can appear larger and place more visual emphasis on the video.
Which option you choose depends on what you are selling and how you want users to discover the item.
Automatic Video Thumbnail
When you upload a video, Npati automatically creates a thumbnail.
You do not always need to upload a separate thumbnail manually.
After the video is processed, you can also choose another frame from the video.
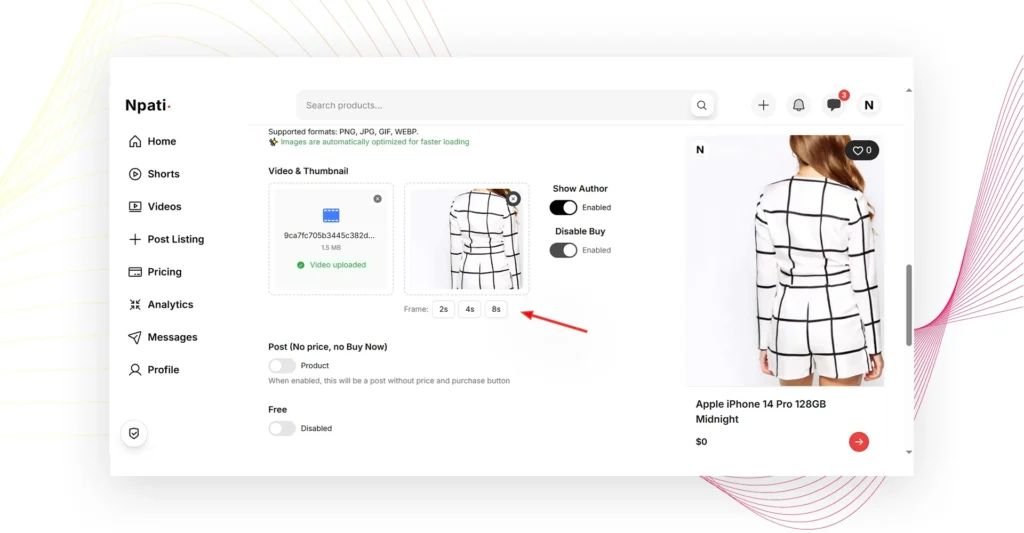
You may see options such as:
Frame: 2s | 4s | 8s
This lets you choose a thumbnail from a different moment in the video.
For example, if the automatic frame does not clearly show the product, try the 2 second, 4 second or 8 second frame and select the one that represents the video best.
You can also upload your own thumbnail if needed.
A good thumbnail should make it immediately clear what the video is about.
Show Author
The listing form includes the:
Show Author
option.
Use the setting according to how you want your author information displayed with the listing.
For sellers who want users to discover their public Npati profile, showing author information can help connect the listing with the person or profile behind it.
This is another reason to complete your Npati profile and upload a profile photo before publishing listings.
Create a Post Without a Price
Npati does not require every piece of content to behave like a traditional product listing.
The form includes:
Post (No price, no Buy Now)
When enabled, the listing becomes a Post.
The price is not displayed and the purchase button is removed.
This is useful when you want to publish content without directly selling the item.
For example, you may want to share something with the community, show an item, publish informational content or create a post where a product price is not necessary.
Instead of showing a price, the card is presented as a post.
Offer an Item for Free
Npati also includes a:
Free
option.
When you enable Free, the normal product price disappears and the listing displays:
Free
This feature is designed for users who want to give something away without charging for it.
Examples may include:
- Furniture you no longer need
- Free household items
- Books
- Children’s items
- Spare materials
- Items available for local pickup
Instead of entering a price of zero manually, enable the Free option so users can clearly understand that the item is being offered at no cost.
Add a Product Price
For a normal marketplace product listing, enter your price in the Price field.
The currency depends on the Npati market you are using.
For the USA version, the field displays:
Price (USD)
Enter the actual price you want buyers to see.
For example:
499.00
Try to use a realistic marketplace price based on the item’s condition, age and current value.
Add a Discount Price
You can also use:
Discount Price
This allows you to show a reduced price when appropriate.
For example, you might have:
Regular Price:
500
Discount Price:
450
Use discounts only when they accurately represent the price you are offering.
Add Product Sizes
Some products need size information.
Npati includes:
Product Sizes
and the option:
Show sizes
When enabled, additional size fields become available.
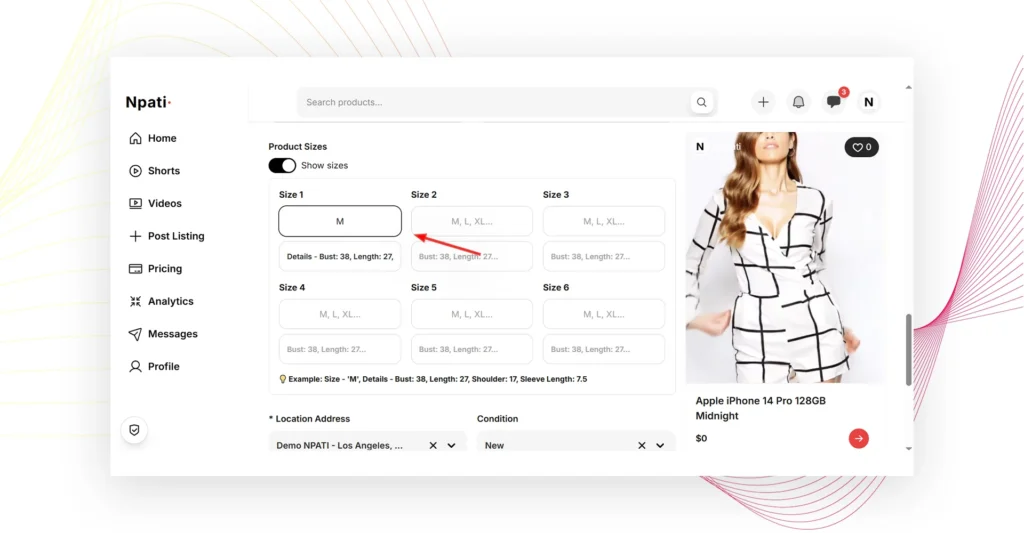
You can add multiple options:
Size 1
Size 2
Size 3
Size 4
Size 5
Size 6
You can use these fields for products such as:
- Shoes
- Clothing
- Jackets
- Dresses
- Furniture
- Equipment
- Other products with different measurements or variants
For example:
Size: M
Details:Bust: 38, Length: 27, Shoulder: 17, Sleeve Length: 7.5
For sneakers, you could enter different available shoe sizes.
The feature is flexible, so use the size fields for information that helps buyers understand the available product options.
Select Your Location Address
The listing form includes the required:
Location Address
field.
If you have already added an address in your Npati Settings, your saved address can appear automatically here.
For example:
Demo NPATI, Los Angeles, CA (Home)
This saves time because you do not need to type the same location information every time you create a listing.
If you need to use another address, you can add a new one.
If you have not added an address yet, read:
How to Add an Address to Npati
You need an address before you can create a listing.
Choose the Product Condition
Use the Condition field to describe the current state of the product.
For example:
New
If other condition options are available for your category, choose the option that accurately represents the item.
Do not list a used product as new.
Accurate condition information is important for buyer trust and can reduce unnecessary questions.
Add Contact Information
The listing form can include contact information such as:
Contact Phone
and:
Check that this information is correct before publishing your listing.
Your saved account or profile information may already be available in these fields.
If buyers have questions, they can also communicate with you through Npati’s messaging features.
Add Listing Tags
At the bottom of the listing form, you can add:
Tags
Npati allows up to 10 tags to help improve product search.
Choose tags that accurately describe the product.
For an iPhone listing, useful tags could include:
iphoneapplesmartphoneiphone 14 pro128gb
Do not add unrelated tags just because they are popular.
Relevant marketplace tags help Npati better understand the item and can make your listing easier to discover in relevant searches.
Check Everything Before Publishing
Before selecting Create, review the entire listing.
Check:
- Title
- Category
- Description
- Product photos
- Photo colors
- Video
- Thumbnail
- Post or Product mode
- Free status
- Price
- Discount price
- Sizes
- Address
- Condition
- Contact details
- Tags
Pay particular attention to the automatically suggested category.
The category may be selected based on your listing title, but because Npati has many categories, you should always confirm that the suggestion is correct.
Publish Your Npati Listing
When everything looks correct, select:
Create
Your listing will then be submitted through the Npati listing process.
If you decide not to continue, select:
Cancel
Once your listing becomes active, users can discover it through the marketplace according to its category, location and other listing information.
Video: How to Create a Listing on Npati
Watch this video to see how to create your first Npati listing step by step.
The video will show how to add a title, check the suggested category, write a description, upload photos, label photos by color, add video, choose a thumbnail frame, set a price, offer an item for free, add sizes, select your saved address and publish the listing.
It will also show the difference between a normal Product listing, a Free listing and a Post without a price.
Creating Listings in the USA, Canada and United Kingdom
The Npati listing creation system works similarly across all three English language markets.
Use the appropriate page:
USA:https://www.npati.com/create-product
Canada:https://www.npati.com/ca/create-product
United Kingdom:https://www.npati.com/gb/create-product
The main workflow is the same.
However, some marketplace information can differ by country, including:
- Categories
- Currency
- Available locations
- Address data
Always make sure you are using the correct Npati market before creating your listing.
Tips for Creating a Better Marketplace Listing
A good listing does not need to be complicated.
Start with a clear title.
Choose the correct category.
Write an honest description.
Upload useful photos that show the actual item.
Use video when it helps explain the product better.
Add the correct price or use Free when you are giving the item away.
Use size options when buyers need measurements or variants.
Make sure your address and contact information are correct.
Finally, add a few relevant product tags.
These steps make your marketplace listing easier for buyers to understand and easier to discover through Npati search and category browsing.
Frequently Asked Questions About Npati Listings
Where do I create a Npati listing?
Use the listing creation page for your market.
USA:https://www.npati.com/create-product
Canada:https://www.npati.com/ca/create-product
United Kingdom:https://www.npati.com/gb/create-product
How many photos can I add to a Npati listing?
You can add up to 6 product photos.
Can I add video to a listing?
Yes. You can upload a video up to 2 GB.
Do I need to create a video thumbnail manually?
No. Npati can automatically generate a thumbnail from your uploaded video.
You can also choose another frame, such as 2 seconds, 4 seconds or 8 seconds, or upload your own thumbnail.
Can I create a listing with only video?
Yes. You can create a video focused listing without adding the standard product photos.
Can I add photos and video together?
Yes. You can combine up to six product photos with a video and thumbnail.
Can I publish something without a price?
Yes.
Enable:
Post (No price, no Buy Now)
The listing will behave as a post without a displayed product price or purchase button.
Can I give an item away for free?
Yes.
Enable Free and the listing will display Free instead of a normal price.
Can I add product sizes?
Yes.
Enable Show sizes under Product Sizes. You can add up to six size options and include additional size details.
Can I label product photos by color?
Yes.
Enable Label photos by color to add color information to individual product photos.
Does Npati automatically choose my category?
Npati can suggest a category based on your listing title.
Always review the category before publishing because the automatic suggestion may not always select the exact category you need.
Do I need an address before creating a listing?
Yes.
You need an address saved in your Npati account before you can create a marketplace listing.
Once saved, the address can be automatically available when creating future listings.
How many tags can I add?
You can add up to 10 tags to help with product search.
Create Your First Npati Listing
Once your account, profile and address are ready, you can start publishing marketplace listings on Npati.
Choose the correct regional Create a Listing page, enter a clear title, check your category, write an accurate product description and choose how you want to present the item.
You can use photos, video or both.
You can create a standard product with a price, offer something for free or publish a post without a price or Buy Now button.
You can also add sizes, label photos by color, choose a video thumbnail, use your saved address and add relevant tags.
If you are just getting started with Npati, follow the guides in this order:
- How to Create a Npati Account
- How to Set Up Your Npati Profile
- How to Add an Address to Npati
- How to Create a Listing on Npati
Once your first listing is active, you can continue improving it with better photos, product video and other Npati marketplace features.