Photos are one of the most important parts of a marketplace listing. Before a buyer reads every detail in your description, they will often look at the product images to understand what you are selling, what condition the item is in, and whether they want to learn more.
On Npati, you can add up to six product photos to a marketplace listing. Therefore, you have enough space to show the item from several useful angles instead of relying on a single image.
This guide explains how to add photos to a Npati listing, how to choose useful product images, how to organize your six available photo positions, and how to avoid common marketplace photography mistakes.
If you are creating your first listing and want to understand every available field, start with our How to Create a Listing on Npati guide.
If your listing already exists and you want to improve the title, description, pricing, media and other details, continue with How to Write a Better Npati Listing.
Quick Answer: How Do You Add Photos to a Npati Listing?
To add photos to a Npati listing, sign in to your account and open the Create a Listing page. Complete the basic listing information, then find the Product Photos section.
You can either click the photo upload area and select images from your computer or device, or drag your images directly into the upload area.
Npati supports PNG, JPG, GIF and WEBP image formats. A listing can contain up to six product photos, and Npati automatically optimizes uploaded images for faster loading.
After the photos appear in your listing, review them carefully before continuing. Each image should help a potential buyer understand the product.
Before You Upload Product Photos
Before adding your images, make sure your Npati account is ready for marketplace selling.
New users should first create a Npati account. After registration, completing your Npati profile can help buyers understand who is behind a listing.
In addition, Npati requires a saved address before you can create marketplace listings. If you have not completed that step yet, follow the How to Add an Address to Npati guide.
Once those basic account settings are ready, you can focus on creating the listing and preparing your product photos.
Step 1: Open Create a Listing
First, sign in to your Npati account.
For the United States marketplace, open the Create a Listing page at:
https://www.npati.com/create-product
The listing form starts with important information such as the title, category and product description.
Although this guide focuses specifically on photos, the images should match the information you enter in those fields. For example, if your title says that you are selling a black iPhone, your photos should clearly show the actual black iPhone being offered.
Consistency makes the listing easier for buyers to understand.
Step 2: Find the Product Photos Section
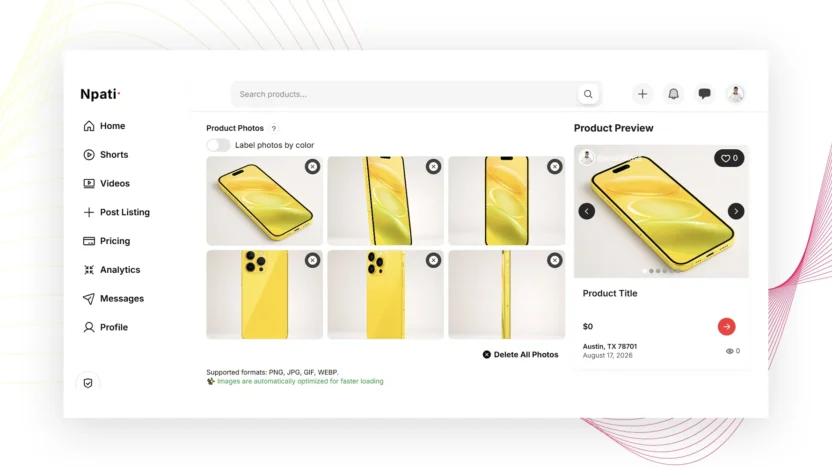
Next, scroll through the Create a Listing form until you reach the Product Photos section.
This area is designed for images of the item you are listing.
Instead of treating photos as decoration, think of them as visual information. Each image should answer a question that a buyer could reasonably have about the product.
For example, one image can show the entire item, while another can show the condition of a specific part.
Step 3: Select or Drag Your Photos
Npati gives you two simple ways to upload your images.
You can click the upload area and choose photos stored on your computer or device. Alternatively, you can drag image files directly into the Product Photos area.
Supported image formats currently include PNG, JPG, GIF and WEBP. Npati then optimizes uploaded images for faster loading.
After uploading, wait until the images have finished processing before continuing with the listing.
How Many Photos Can You Add to a Npati Listing?
A Npati marketplace listing can include up to six product photos.
However, you do not need to fill every position with an almost identical image.
Instead, use the available space to provide different information about the item.
A useful six photo structure is:
- Photo 1: clear main view of the complete product
- Photo 2: opposite side or back
- Photo 3: another useful angle
- Photo 4: important feature or close detail
- Photo 5: accessories or items included with the sale
- Photo 6: scratches, wear, damage or another condition detail
This approach gives every photo a purpose.
As a result, buyers can inspect the product without scrolling through several copies of essentially the same picture.
Choose a Strong First Photo
The first product photo deserves extra attention because it introduces the item visually.
Choose an image where the product is easy to recognize. Ideally, the full item should be visible, the lighting should be clear, and distracting objects should not compete for attention.
For example, if you are selling an iPhone, a clean front or three quarter view of the phone can work well as the main photo.
Meanwhile, a close photo of a tiny scratch usually makes more sense later in the gallery.
Think about the first image as an introduction. It should quickly answer one simple question: what is being sold?
Show the Actual Product
Whenever possible, photograph the real item that the buyer will receive.
This is especially important for used products because condition can vary significantly from one item to another.
A manufacturer image may show what a product looked like when it was new. However, a buyer looking at a used phone, sofa, laptop or tool usually needs to see the actual item being offered.
Real photos can show wear, included accessories, color, current condition and other details that generic promotional images may not communicate.
Therefore, your images and written description should work together.
Use Clear Lighting
Good lighting can make product details easier to see.
Natural daylight often works well for marketplace photos. For example, you can photograph an item near a window or in a bright room where the light is even.
However, direct sunlight can sometimes create strong reflections or dark shadows. If that happens, move the item slightly or photograph it when the light is softer.
For electronics with reflective screens, check the image before uploading it. A phone or laptop display should not be completely hidden by glare.
In addition, avoid very dark rooms when possible. Buyers should not have to guess what the product looks like.
Keep the Background Simple
A simple background helps keep attention on the product.
You do not necessarily need professional photography equipment or a studio. Instead, choose a clean area where the product can be seen clearly.
For smaller objects, a table, desk or neutral surface can work well.
For furniture, remove unnecessary clutter from the surrounding area before taking the photo.
Similarly, when photographing a vehicle, try to position it where the entire car is visible without unrelated objects blocking important parts.
The goal is clarity, not perfection.
Keep the Product in Focus
Blurry photos can hide useful details.
Before uploading an image, zoom in and check whether the important parts of the item are sharp enough to inspect.
Modern smartphones can usually take clear marketplace photos when there is enough light. Therefore, you often do not need a separate camera.
Still, hold the device steady and give the camera a moment to focus before taking the picture.
If an image is noticeably blurry, take another one rather than using it simply to fill an available photo position.
Photograph Different Angles
Different products require different visual information.
For a smartphone, buyers may want to see the screen, back, camera area, edges and accessories.
For furniture, useful photos can show the front, sides, back, surface texture and any visible wear.
A vehicle listing may benefit from exterior angles, interior photos, wheels, dashboard and condition details.
Likewise, clothing can be photographed from the front and back, followed by close views of the material, label and important details.
Instead of following one universal photography formula, ask yourself what someone would want to inspect if they were standing next to the item.
Show Scratches, Wear and Damage
Used products do not need to look perfect.
In fact, hiding known damage can create problems later.
If an item has a scratch, dent, stain, crack or another visible defect, include a clear photo of that area. Then explain the same issue accurately in the product description.
For example, you might write that the phone has a small cosmetic scratch on one corner and direct the buyer to the relevant photo.
This combination of visual and written information makes the listing easier to understand.
For more guidance on writing accurate condition information, read How to Write a Better Npati Listing.
Photograph Included Accessories
If accessories are included in the sale, show them.
A laptop listing could include the charger in one photo. Likewise, a camera listing could show the battery, charger, lens or case that comes with it.
For a phone, you may want to photograph the charging cable, original box or case if those items are part of the offer.
Consequently, the buyer can visually confirm what is included instead of relying only on the description.
However, do not place unrelated accessories in the photo if they are not included. Doing so may make the offer confusing.
Use the Label Photos by Color Feature When Needed
Some products are available in several colors.
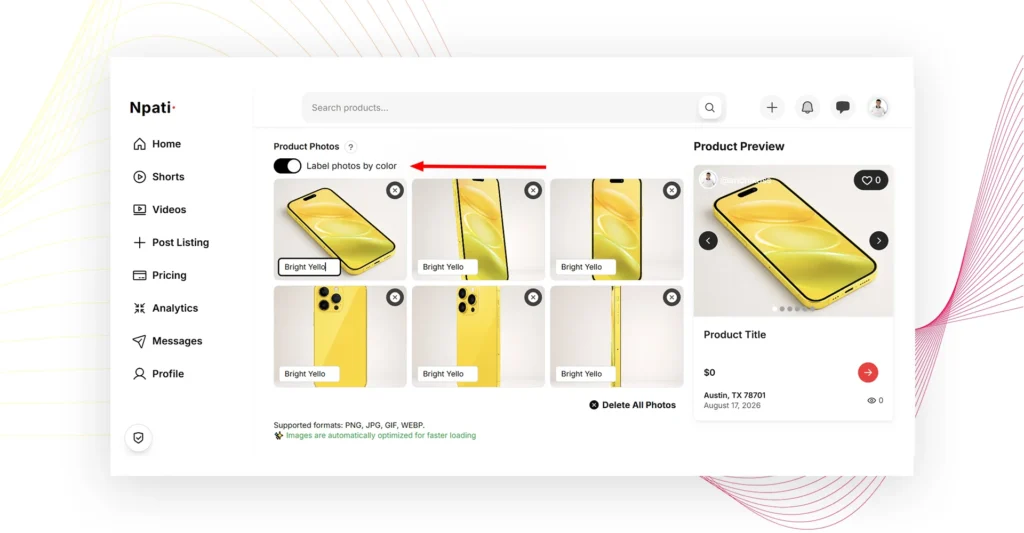
In that situation, Npati provides a Label photos by color option. When enabled, you can associate color information with individual uploaded photos.
For example, suppose the same product is available in black, white and blue. You can upload images for those versions and connect the appropriate color information to each photo.
This feature is particularly useful for clothing, shoes, accessories, furniture and other products where color is an important part of the buying decision.
On the other hand, if you are selling one unique used item in a single color, there may be no reason to use the feature.
Match Your Photos With the Listing Title and Description
Strong product photos should support the written information in your listing.
Suppose your title is Apple iPhone 14 Pro 128GB Midnight. In that case, the photos should clearly show the phone being described.
If the description mentions a scratch, photograph the scratch.
Likewise, when your description says that the original charger is included, showing the charger can make the information even clearer.
This relationship between text and images also creates a more complete page context.
Rather than adding unrelated keywords, use accurate product names, models, colors, conditions and specifications naturally throughout the listing.
Avoid Keyword Stuffing
SEO does not mean repeating the same phrase in every sentence.
For example, there is no need to write iPhone for sale, buy iPhone, used iPhone marketplace and similar phrases repeatedly if they make the description unnatural.
Instead, describe the actual product.
Specific information such as the brand, model, storage capacity, condition, color and included accessories gives both people and search systems useful context.
The same principle applies to this guide. Clear answers and specific terminology make a page easier to interpret than artificial keyword repetition.
Photos Only or Photos With Video?
Npati gives sellers several ways to present marketplace content.
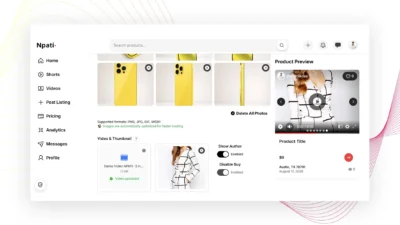
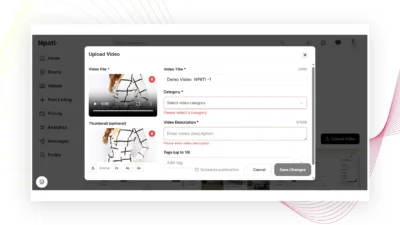
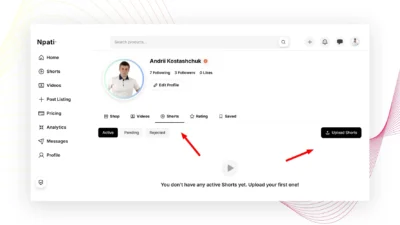
You can create a traditional listing with up to six photos. Alternatively, you can combine product photos with a video and thumbnail. Npati also supports a video focused presentation where standard product photos are not required.
For many physical products, photos and video can complement each other.
Photos are useful when someone wants to stop and inspect a specific detail. Video, by comparison, can demonstrate movement, functionality or the overall condition of the item from several angles.
For example, photos can show the exterior condition of a laptop, while a short video can demonstrate that it turns on and works.
If you want to understand all three listing presentation options, see the complete How to Create a Listing on Npati tutorial.
Product Photo Tips for Smartphones
When selling a smartphone, begin with a clean photo that shows the complete device.
Afterward, photograph the back, camera area and edges. If the screen has scratches, show them in a clear close view.
You can also include the charger, case or original box when those accessories are part of the sale.
Before taking photos, gently clean fingerprints from the screen and camera area. However, do not edit the images in a way that hides real damage or changes the condition of the phone.
Accurate photos are more useful than images that make the item appear different from reality.
Product Photo Tips for Furniture
Furniture usually needs more visual context because size, shape and condition can be difficult to understand from one image.
Start with a photo showing the complete piece of furniture. Next, capture another angle so buyers can understand its depth and proportions.
Close photos can then show the fabric, wood surface, hardware or other materials.
If there are scratches or stains, photograph them as well.
In addition, make sure the room is bright enough to show the actual color of the item as accurately as possible.
Product Photo Tips for Cars and Vehicles
Vehicle listings can benefit from a wider range of angles.
Begin with a clear exterior view. After that, photograph additional sides of the vehicle and important interior areas.
Dashboard, seats, wheels, cargo space and visible condition details may also be useful depending on the vehicle.
If damage is present, show it clearly instead of photographing only the best side of the car.
Meanwhile, video can complement those images by showing the vehicle running or providing a walkaround view.
Product Photo Tips for Clothing and Shoes
Color, material and condition are especially important when listing clothing or shoes.
Use enough light to make the actual color easy to see. Next, photograph the front and back.
Close images can show fabric texture, labels, stitching, soles or condition details.
For products available in several colors, consider using Npati’s photo color labeling feature so the images are easier to organize.
Common Mistakes When Adding Listing Photos
One common mistake is uploading several nearly identical images. Another problem is using photos that are too dark, blurry or far away from the product.
Busy backgrounds can also make an item harder to see.
In addition, sellers sometimes photograph only the best areas of a used item while leaving visible damage out of the gallery.
Another issue occurs when accessories appear in the photos even though they are not included in the sale.
Before publishing, therefore, review every image and ask whether it adds useful information.
If two photos communicate exactly the same thing, consider replacing one with a different angle or detail.
Should You Edit Product Photos?
Basic adjustments can be useful when they make a photo easier to view.
For instance, cropping unnecessary empty space can bring attention back to the item. Slight corrections to brightness may also help when an otherwise accurate image is too dark.
However, editing should not misrepresent what you are selling.
Avoid removing scratches, changing product colors, hiding damage or adding accessories that are not part of the actual offer.
The final image should still represent the real item accurately.
How Photos Help Create a Better Npati Listing
A useful marketplace listing combines clear text with relevant visual information.
Your title identifies the product. The description explains its features and condition. Meanwhile, photos let buyers inspect what those words describe.
For that reason, photos should not be treated as an isolated part of the listing.
Use the complete listing form together.
After uploading your images, review the price, condition, description, location, tags and other applicable fields.
You can find a detailed optimization strategy in How to Write a Better Npati Listing.
Frequently Asked Questions About Npati Listing Photos
How many photos can I add to a Npati listing?
You can add up to six product photos to a Npati marketplace listing.
What image formats does Npati support?
Npati currently supports PNG, JPG, GIF and WEBP images for product photo uploads.
How do I upload photos to Npati?
Open Create a Listing and find the Product Photos section. Then click the upload area to select files from your device, or drag your images directly into the upload area.
Can I upload both photos and video?
Yes. Npati allows you to combine up to six product photos with a video and thumbnail.
Do I have to upload six photos?
No. You can use fewer photos when they are enough to show the product clearly. However, each photo you add should provide useful information rather than repeat the same view.
Can I label Npati product photos by color?
Yes. Enable Label photos by color when color information is relevant to the product. You can then associate colors with the appropriate uploaded images.
What should my first listing photo show?
Choose a clear image that quickly shows the complete product. Good lighting, a simple background and an easy to recognize view usually work well.
Should I show damage in my listing photos?
Yes. If a used product has scratches, dents, stains or other visible wear, clear photos can help buyers understand its actual condition. Mention important defects in the description as well.
Are real product photos better for used items?
For used products, photos of the actual item provide important information about its current appearance, condition, accessories and wear.
Should I add video in addition to photos?
Consider adding video when movement or functionality matters. Electronics, vehicles, appliances, tools, clothing and other products can often benefit from a short visual demonstration.
Before You Publish Your Npati Listing
Take one final look at the complete listing before submitting it.
Make sure the product is easy to identify in the first photo. Check that the remaining images show useful angles and details. Confirm that visible defects are not hidden and that accessories shown in the photos match what is included in the description.
Next, review the title, category, price, condition, address and tags.
Finally, decide whether video would help explain something that your photos cannot show clearly.
A good photo gallery does not need to look like a professional advertising campaign. Instead, it should give buyers a clear, accurate and useful view of the item.
Continue Learning With Npati Guides
Adding good product photos is one part of creating a complete marketplace listing.
If you are new to Npati, start with How to Create a Npati Account, then set up your Npati profile and add your address to Npati.
When your account is ready, use How to Create a Listing on Npati for the complete listing process.
Afterward, read How to Write a Better Npati Listing to improve your title, description, media, pricing, condition information and other listing details.
You can also visit the complete Npati Guides section for more step by step tutorials about Npati marketplace features.
Start Adding Better Photos to Your Npati Listings
Product photos should help a buyer understand what you are selling before they send their first message.
Start with a strong main image. Then use the remaining photo positions to show different angles, important features, accessories and honest condition details.
When color matters, use Npati’s photo color labeling feature. In addition, consider combining photos with video when a product is easier to understand through movement or demonstration.
Most importantly, keep your images accurate and useful.
When your photos, title and description all describe the same product clearly, the entire Npati listing becomes easier for buyers to understand.