Npati lets users publish short form videos as standalone content through Npati Shorts.
However, uploading a Short is different from adding video media to a marketplace listing.
A standalone Npati Short is published through the Shorts section of your profile. It has its own video file, thumbnail, title, category, description, tags and publication settings.
Marketplace video, by comparison, belongs to a specific listing and is designed to help present an item, product or post.
This distinction matters because the content appears in different areas of Npati and serves a different purpose.
In this guide, you will learn how to upload a Short video on Npati, choose a thumbnail, select a category, add tags, schedule publication, edit or delete your Shorts and embed a Short on another website.
If you want to publish a longer standalone video instead, read How to Upload Videos on Npati.
For video that belongs directly to something you are selling, use How to Add Product Video to a Npati Listing instead.
Quick Answer: How Do You Upload a Short Video on Npati?
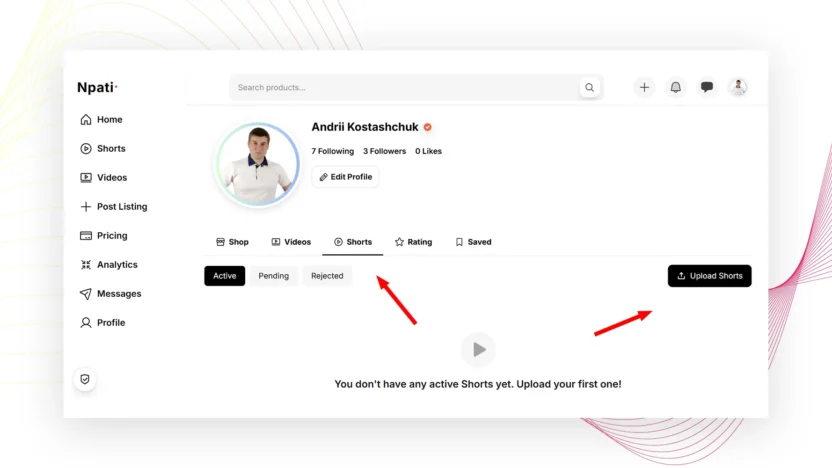
Sign in to your Npati account and open your Profile page.
Next, select the Shorts tab.
On the right side of the Shorts section, choose Upload Shorts.
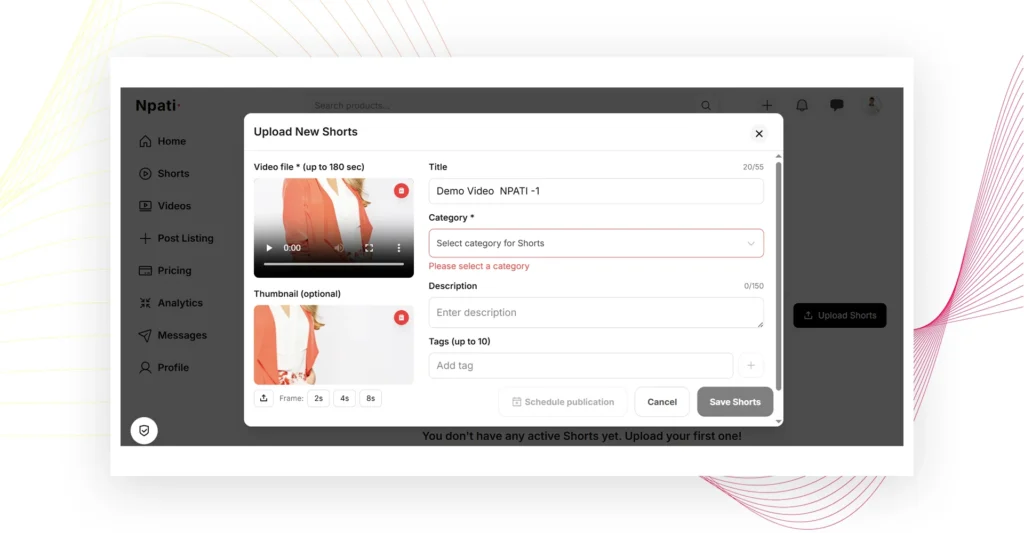
The Upload New Shorts window will open. From there, upload your video file, add an optional thumbnail, enter a title, select a category, write a short description and add relevant tags.
You can also enable Schedule publication if you want the Short to be published later.
Finally, review the information and select Save Shorts.
What Are Npati Shorts?
Npati Shorts are standalone short form videos published through a user’s profile.
They are not simply attachments inside a marketplace listing.
Instead, each Short becomes its own piece of video content that can be discovered through Npati’s Shorts experience.
A Short can be useful for many types of content, including:
- Quick product demonstrations
- Marketplace tips
- Before and after clips
- Short tutorials
- Product highlights
- Creator content
- Behind the scenes videos
- New item previews
- Simple how to videos
- Short visual updates
Because Shorts are separate content, you can publish them even when you are not creating a marketplace listing.
Npati Shorts vs. Regular Npati Videos
Npati supports both Shorts and regular Videos, but they are separate publishing formats.
Shorts are designed for shorter video content and currently allow a video length of up to 180 seconds.
Regular Npati Videos use a different upload area and have their own publishing workflow.
Therefore, choose Shorts when your content works well as a quick, focused video.
For longer tutorials, reviews, demonstrations or other extended content, the standard video format may be a better fit.
You can learn that process in How to Upload Videos on Npati.
Npati Shorts vs. Video in a Marketplace Listing
Another important difference is where the video belongs.
A Short is standalone content.
By contrast, video added through the marketplace listing form becomes part of that particular listing.
For example, imagine that you are selling an iPhone.
Your listing could contain product photos, pricing, condition information and a product video showing the phone.
Separately, you could publish a Short that quickly shows the iPhone from several angles or highlights one interesting feature.
As a result, the marketplace listing remains focused on the offer, while the Short becomes separate content that people can discover through the Shorts experience.
For the complete listing workflow, see How to Create a Listing on Npati.
Step 1: Sign In to Your Npati Account
First, sign in to the Npati account where you want to publish the Short.
If you do not have an account yet, start with How to Create a Npati Account.
After signing in, open your Profile.
Npati currently has four regional markets, so your profile URL depends on the market you use.
United States
Ukraine
https://www.npati.com/ua/profile
Canada
https://www.npati.com/ca/profile
United Kingdom
https://www.npati.com/gb/profile
The exact URL changes by market. Nevertheless, the general Shorts publishing process follows the same structure.
If you are still setting up your account, read How to Set Up Your Npati Profile before publishing content.
Step 2: Open the Shorts Tab
Once your Profile page is open, select the Shorts tab.
This section is where you can view and manage the Shorts connected to your account.
After opening the tab, look toward the right side of the page.
There you will find the Upload Shorts button.
Select it to begin creating a new Short.
Step 3: Open Upload New Shorts
After you select Upload Shorts, Npati opens the Upload New Shorts window.
The form includes the following areas:
- Video file
- Thumbnail
- Title
- Category
- Description
- Tags
- Schedule publication
Some fields are required, while others are optional.
Before saving, review every section so that your Short has enough information for viewers to understand what it is about.
Step 4: Upload Your Short Video File
The first required field is Video file.
Select Upload Shorts and choose your video from your device.
Npati currently supports:
- MP4
- MOV
- AVI
- WebM
The video can be up to 2 GB and up to 180 seconds long.
If your file exceeds either limit, prepare a shorter or smaller version before uploading it.
Before selecting the file, it is also worth watching the complete video once.
Check the beginning, middle and ending. In addition, make sure there are no accidental clips, long blank sections or unwanted audio.
What Should You Show in a Npati Short?
A Short usually works best when it has one clear subject.
For example, a seller might quickly show a product from several angles.
A creator could share a short tutorial.
Meanwhile, a business could introduce a new product or highlight one useful feature.
Instead of trying to explain several unrelated topics in one Short, focus on a specific idea.
For instance:
Used iPhone 14 Pro Condition Check
is a clear subject.
Likewise:
How to Photograph a Phone for Sale
immediately tells viewers what the Short is about.
Focused content also makes it easier to create a relevant title, description, category and tags.
Step 5: Add a Custom Thumbnail
The Thumbnail field is optional.
If you already have an image that represents your Short clearly, select Upload Custom Thumbnail.
Supported thumbnail formats include:
- JPG
- PNG
- WebP
The thumbnail can be up to 10 MB.
Choose an image that matches the actual content of the Short.
For example, if your Short demonstrates an iPhone, the thumbnail should show that phone or another accurate frame from the same content.
Avoid using an unrelated image simply because it looks more dramatic.
Choose Another Frame From Your Short
You do not always need to upload a custom thumbnail.
Npati also provides a way to choose another frame from the uploaded video.
This is useful when the first generated thumbnail does not clearly show the subject.
For instance, the beginning of your Short may contain motion blur while you position the camera.
In that case, another frame from a later moment may provide a much clearer thumbnail.
Review the available options and select the frame that represents the Short best.
The thumbnail selection process is similar to the one available when adding video to a Npati marketplace listing.
Step 6: Add a Short Title
The Title field supports up to 55 characters.
Use that space to tell viewers what the Short is about.
A specific title is usually more useful than a vague one.
For example:
Yellow iPhone Product Photo Setup
is clearer than:
My New Short
Similarly:
How to Show Used Phone Condition
provides more context than:
Watch This
Whenever possible, include the main topic early in the title.
However, avoid repeating the same word several times simply for search optimization.
The title should remain natural and easy to understand.
Should You Use Keywords in Your Short Title?
Relevant keywords can help describe your content, but they should fit naturally.
If the Short is about an iPhone camera test, words such as iPhone, camera and test make sense.
On the other hand, unrelated popular phrases do not improve the quality of the title.
Think about what someone might reasonably type when looking for the subject shown in your Short.
Then write a concise title that accurately answers that intent.
Step 7: Select a Shorts Category
The Category field is required.
Open the category selector and choose the option that best matches your Short.
Npati provides different categories for Shorts, so the available choices let you organize your content by topic.
For example, a technology Short should use a relevant technology related category when one is available.
Meanwhile, another category may be more appropriate for fashion, vehicles, home content or another topic.
Accurate categorization is more useful than choosing a popular but unrelated category.
Therefore, review your selection before saving the Short.
Step 8: Write the Shorts Description
The Description field supports up to 150 characters.
Because the space is short, explain the subject directly.
For example:
Quick look at a bright yellow smartphone from several angles, including the front, back, cameras and side profile.
That description quickly explains what viewers will see.
A weaker description would be:
Check out my video!
The second example provides almost no information about the content.
Instead, use the available space for specific details.
How to Write a Better Short Description
Begin with the main topic whenever possible.
Next, add one useful detail about what the viewer will see or learn.
For example:
See how to photograph a used iPhone for a marketplace listing, including the screen, back, camera and visible condition.
This type of description provides clear context without unnecessary keyword repetition.
Moreover, the title and description should support each other rather than repeat exactly the same phrase.
Step 9: Add Relevant Tags
Npati allows up to 10 tags for a Short.
Tags should describe the real content of your video.
For an iPhone related Short, examples could include:
- iPhone
- smartphone
- phone
- product video
- product photography
- marketplace
- selling online
However, you do not need to use all 10 tags.
A smaller group of relevant tags is better than filling every available position with unrelated terms.
In addition, avoid adding popular keywords that have nothing to do with the Short.
Accurate tags provide cleaner context for the content.
Step 10: Schedule Your Short for Publication
Npati includes a Schedule publication option.
Instead of publishing your Short immediately, you can prepare it in advance and select a later publication time.
This can be useful if you create several Shorts during one content session.
For example, you could prepare multiple videos and schedule them to appear at different times.
As a result, you do not need to return to the upload form every time you want another Short to become available.
Before saving a scheduled Short, double check the selected publication date and time.
Step 11: Save Your Short
After completing the upload form, review everything one more time.
Check the video file first.
Then review the thumbnail, title, category, description and tags.
If you enabled scheduling, verify the publication settings as well.
Once everything is correct, select Save Shorts.
If you decide not to publish the content, select Cancel instead.
Where Do Npati Shorts Appear?
Published Shorts are separate from marketplace listing media.
Some Shorts can appear in a dedicated Shorts block on the Npati homepage.
In addition, Npati has a main Shorts section where users can discover short form video content.
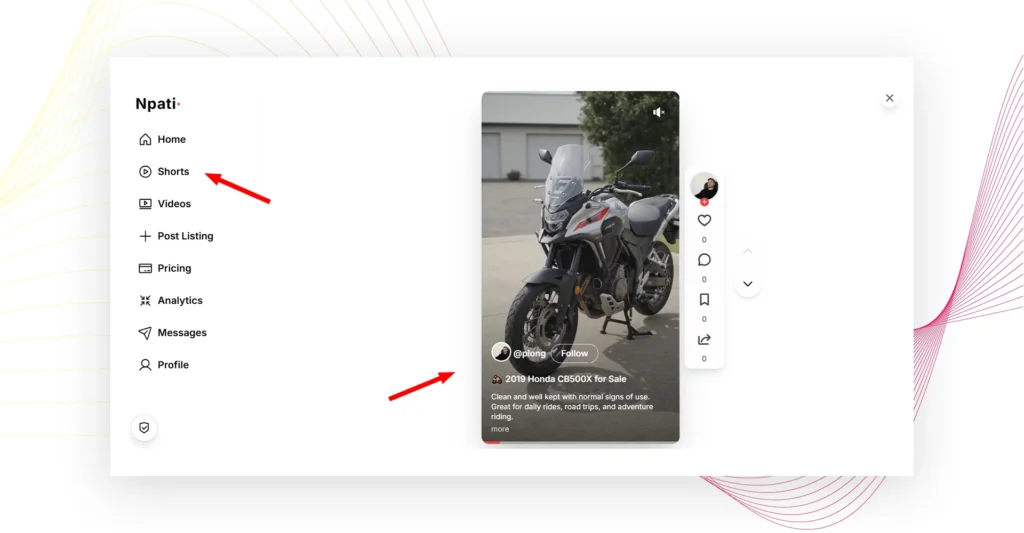
Content placement can vary depending on how Shorts are displayed across the platform.
Meanwhile, your own uploaded Shorts remain available through the Shorts tab in your Profile.
That profile section also gives you access to management controls when you need to update or remove content.
How to Find Your Uploaded Shorts
Open your personal Npati Profile.
Next, select Shorts.
Your uploaded Shorts appear in that section.
From there, you can review the content associated with your account and access additional management options for individual Shorts.
As a result, you do not need to search through the public Shorts feed when you want to manage your own content.
How to Edit a Short on Npati
You may sometimes want to change information after uploading a Short.
Start by opening your Profile and selecting Shorts.
Find the Short you want to update.
Next to each Short, you will see a three dot menu.
Select the three dots to open the available actions.
Then choose the edit option.
Depending on the available fields, you can update information connected to the Short and save your changes.
For example, editing may be useful when you notice a typo in the title or want to improve the description.
How to Delete a Short on Npati
The three dot menu also provides the option to delete your own Short.
Open Profile, select Shorts and locate the correct video.
Next, open the three dot menu.
Choose the delete action and review the confirmation carefully.
Because deletion removes content, make sure you selected the correct Short.
If the problem is only a title or description mistake, editing may be a better option.
How to Embed a Npati Short on Another Website
Npati also provides embed functionality for Shorts.
With the available embed code, you can place supported Npati Shorts on another website.
This is useful when you want to publish the video on Npati but also show it inside:
- A blog article
- A product page
- A company website
- A tutorial
- A portfolio
- Another webpage that supports embedded content
Embedding lets visitors watch the content from the page where you place it.
How to Embed a Npati Short in WordPress
WordPress can be used to display your Npati Short with the available embed code.
First, obtain the embed code for the Short.
Afterward, sign in to your WordPress dashboard and open the post or page where the video should appear.
Add a Custom HTML block or another compatible area that accepts embed code.
Next, paste the Npati code into the block.
Preview the page before publishing.
Finally, confirm that the Short displays correctly on both desktop and mobile devices.
Should You Publish a Short or a Regular Video?
Choose the format based on the content.
A Short can be useful when you want to communicate one idea quickly.
For example, you may want to show:
- One product feature
- A quick product preview
- A short before and after
- A simple tip
- A quick tutorial
- A short demonstration
By comparison, regular Npati Videos can be more appropriate for content that needs additional explanation.
A detailed product review, longer tutorial or extended demonstration may require the standard video format.
If that is your goal, see How to Upload Videos on Npati.
Should You Publish a Short or Add Video to a Listing?
The purpose is different.
Choose a marketplace listing when the main goal is to sell, offer or present a specific item through a marketplace card.
Video attached to that listing becomes part of the product presentation.
A Short, however, is separate short form content.
For example, you might create a marketplace listing for a used smartphone and then publish a separate Short showing the phone from different angles.
The listing can contain the full price, condition, description, location, photos and product video.
Meanwhile, the Short can focus on one quick visual idea.
If you need to create the marketplace item first, read How to Create a Listing on Npati.
Can You Use Shorts Together With Marketplace Listings?
Yes. The two content types can complement each other.
Suppose you are selling a piece of furniture.
Your listing can include detailed photos, dimensions, price, condition and product information.
Separately, you could publish a Short showing a quick walk around the furniture.
Likewise, an electronics seller could create a full listing and publish a Short showing the device turning on.
The important part is to give each piece of content a clear purpose.
Avoid publishing several copies that provide no additional value.
Tips for Recording Better Npati Shorts
A good Short should be easy to understand quickly.
Start by deciding on one subject before recording.
Next, make sure the main object is clearly visible.
Good lighting also helps viewers see details more easily.
Meanwhile, slow and controlled camera movement usually makes products easier to inspect than fast movement.
If the Short contains spoken information, check that the voice can be heard clearly.
Finally, watch the complete file before uploading it.
Keep the First Part of the Short Clear
The beginning of a Short is important because viewers need to understand the subject quickly.
Therefore, avoid spending too much time showing an empty room, moving the camera into position or waiting before anything happens.
Instead, introduce the main subject early.
For a product Short, the item could already be visible in the opening moment.
For a tutorial, begin with a clear indication of what you are going to show.
This makes the content easier to understand from the start.
Keep the Background Simple
A clean background can help the subject stand out.
You do not need a professional studio.
For smaller products, a desk, table or neutral surface may be enough.
Likewise, larger products can be filmed in a clean area with enough room to move around safely.
Remove unrelated items when they distract from the subject.
However, the scene does not have to look artificial.
The main goal is to make the Short clear and useful.
Show the Real Product Condition
If you use Shorts to show something you are selling, represent the product accurately.
For a used item, do not deliberately hide visible scratches, dents or other known issues.
Instead, show important condition details clearly.
That approach can make the Short more useful when someone later visits the related marketplace listing.
You can also improve the listing itself with the recommendations in How to Write a Better Npati Listing.
Use Photos, Listing Video and Shorts for Different Purposes
Npati gives you several visual formats, and each one can do a different job.
Product photos are useful for detailed still views. To learn how to prepare them, read How to Add Photos to a Npati Listing.
Product video inside a listing can demonstrate condition or functionality. The complete process is explained in How to Add Product Video to a Npati Listing.
Standalone regular videos can provide longer content. See How to Upload Videos on Npati.
Finally, Shorts provide a separate format for shorter video content.
Using each format for the right purpose can make your Npati content easier to organize and understand.
Make Your Short Easy for Search and AI Systems to Understand
There is no need to fill a Short with repeated keywords.
Instead, provide clear and accurate information.
Use a descriptive title.
Choose the closest category.
Write a short description that states what the video shows.
Then add a few relevant tags.
For example, a Short titled:
How to Photograph an iPhone for Sale
with a description explaining that it shows smartphone product photography gives strong context about the topic.
That approach is more useful than repeating iPhone video, iPhone short, buy iPhone and other phrases that do not naturally describe the content.
Clear information helps both viewers and automated systems understand the subject.
Common Mistakes When Uploading Npati Shorts
One common mistake is using a vague title.
Another problem is selecting an unrelated category.
Some users may also add too many unrelated tags.
In addition, a blurry thumbnail can make the content harder to recognize.
Poor lighting may hide the main subject as well.
Finally, uploading a video without checking its length, file size or beginning can create unnecessary problems during publication.
A quick review before saving can prevent many of these issues.
Npati Short Upload Checklist
Before selecting Save Shorts, confirm that:
- The video file is correct
- The video does not exceed 180 seconds
- The file does not exceed 2 GB
- The thumbnail represents the content accurately
- The title clearly explains the topic
- The correct category is selected
- The description provides useful context
- The tags are relevant
- The publication schedule is correct, if enabled
After completing these checks, your Short is ready to save.
Frequently Asked Questions About Npati Shorts
How do I upload a Short video on Npati?
Open your Npati Profile, select the Shorts tab and choose Upload Shorts. Upload your file, complete the available content fields and select Save Shorts.
Where is the Upload Shorts button?
The Upload Shorts button is located on the right side of the Shorts section in your Npati Profile.
How long can a Npati Short be?
A Npati Short can currently be up to 180 seconds long.
What is the maximum Npati Shorts file size?
The video file can be up to 2 GB.
What video formats can I upload?
Npati Shorts support MP4, MOV, AVI and WebM files.
Do I need to upload a custom thumbnail?
No. A custom thumbnail is optional.
What thumbnail formats can I use?
You can upload JPG, PNG or WebP thumbnail images up to 10 MB.
Can I choose another frame for my Shorts thumbnail?
Yes. You can select another available frame from the video when a different moment represents the Short better.
How long can the Npati Short title be?
The Title field supports up to 55 characters.
Is a title required?
The Shorts upload interface includes a Title field. Use it whenever possible to clearly identify the content.
Is a category required?
Yes. You need to select a category for the Short.
How long can the Shorts description be?
The Description field supports up to 150 characters.
How many tags can I add?
You can add up to 10 relevant tags.
Can I schedule a Npati Short?
Yes. Enable Schedule publication when you want the Short to be published at a future time.
Can I edit a Short after uploading it?
Yes. Open your Profile, go to Shorts and use the three dot menu beside the Short to access the available editing option.
Can I delete a Npati Short?
Yes. The three dot menu also provides a way to delete your own Shorts.
Can I embed a Npati Short on another website?
Yes. Npati provides embed code for supported Shorts so they can be displayed on compatible websites.
Can I add a Npati Short to WordPress?
Yes. Copy the available embed code and paste it into a WordPress Custom HTML block or another compatible HTML area.
Is a Npati Short the same as a marketplace listing video?
No. A Short is standalone short form content. Video inside a marketplace listing belongs to that specific marketplace item or post.
Is a Npati Short the same as a regular Npati Video?
No. Shorts and regular Videos are separate content formats with different publishing areas.
Continue Learning With Npati Guides
Shorts are one part of Npati’s marketplace and social content tools.
If you are new to Npati, begin with How to Create a Npati Account.
Next, use How to Set Up Your Npati Profile to prepare your public identity and profile information.
If you want to start selling, continue with How to Add an Address to Npati and How to Create a Listing on Npati.
For listing optimization, read How to Write a Better Npati Listing.
Product media guides are also available for adding photos to a Npati listing and adding product video to a Npati listing.
For longer standalone content, see How to Upload Videos on Npati.
You can also explore the complete Npati Guides section and the Npati Videos guides for more tutorials.
Start Publishing Shorts on Npati
Uploading a Short on Npati starts from your Profile.
Open the Shorts tab and select Upload Shorts.
Afterward, upload a supported video file, choose a clear thumbnail, write a descriptive title, select the correct category and add a short description.
Relevant tags can provide additional context, while Schedule publication lets you prepare content for a future time.
Once the Short is published, you can manage it from the Shorts section of your Profile.
Editing and deletion controls are available through the three dot menu. In addition, supported Shorts can be embedded on another website, including WordPress.
Most importantly, remember the difference between Npati’s content formats:
Npati Shorts are standalone short form videos.
Npati Videos are standalone regular video content.
Marketplace video is media connected to a specific listing.
Choosing the correct format makes your content easier for viewers, search systems and AI systems to understand.