A product video can show details that are difficult to communicate with photos alone. Buyers can watch an electronic device working, inspect a used item from several angles, see how clothing moves, or get a better sense of the size and condition of furniture.
Npati lets you add video directly to a marketplace listing. More importantly, there are two different ways to use product video in a Npati listing.
You can combine photos with a video and thumbnail, or you can create a Video Focused Listing that uses video without the standard product photo gallery. In the video focused format, the video based listing card can appear larger and give the video more visual emphasis.
This guide explains how to upload product video to Npati, how both video modes work, how to choose a thumbnail, what to show in your video, and how video can work together with the rest of your listing.
If you need instructions for every field in the listing form, start with How to Create a Listing on Npati.
Quick Answer: How Do You Add Product Video to a Npati Listing?
To add product video to a Npati listing, sign in to Npati and open the Create a Listing page. Complete your title, category and product description, then find the Video & Thumbnail section.
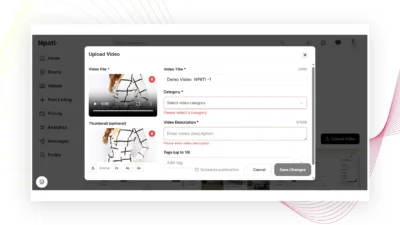
Upload your product video there. Npati currently supports listing video uploads up to 2 GB. After the upload is processed, Npati can automatically create a thumbnail from the video.
Next, choose how you want the listing to appear.
You have two video options:
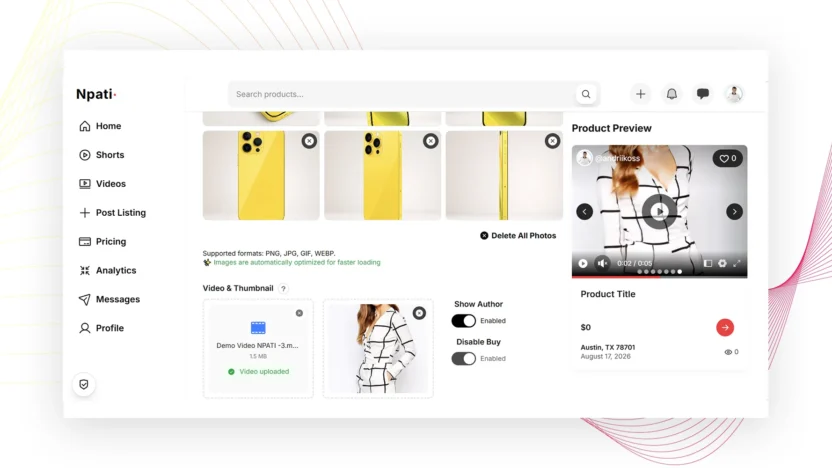
- Photos + Video + Thumbnail: Add up to six product photos together with a product video and thumbnail. Video Focused Listing: Upload the video without the six standard product photos. Npati automatically creates a thumbnail, and this video based card can appear larger to give the video more visual emphasis.
The right option depends on the product and the type of information you want buyers to see first.
Before You Add Video to a Npati Listing
Before uploading product video, make sure the basic parts of your account are ready.
If you are new to Npati, begin with How to Create a Npati Account. After registration, you can set up your Npati profile so buyers can learn more about the seller behind the listing.
In addition, a saved address is required before creating a marketplace listing. If you have not completed that part yet, follow How to Add an Address to Npati.
Once those steps are complete, you can create a listing and decide how video should be presented.
Step 1: Open Create a Listing
First, sign in to your Npati account.
For the United States marketplace, the listing creation page is:
https://www.npati.com/create-product
Before reaching the video section, enter the basic information about your item.
Start with a clear product title. Next, choose or review the category and write an accurate product description.
Your video should support that written information rather than introduce a different product or different condition.
For example, if your listing describes a used iPhone with a small scratch on one corner, the product video should show the actual phone and should not hide that area.
If you want to improve the written part of your listing as well, use How to Write a Better Npati Listing as the next guide.
Step 2: Find the Video & Thumbnail Section
Continue through the Create a Listing form until you reach Video & Thumbnail.
This is where you can upload the product video connected to the listing.
Npati currently allows a listing video of up to 2 GB.
After you select the video, allow it to finish uploading and processing before you continue.
At this stage, you should also decide whether you want to combine the video with traditional product photos or build the listing around the video itself.
That choice changes how the listing is visually presented.
Step 3: Choose Between the Two Npati Video Modes
Npati gives sellers two different ways to create a listing that contains video.
Although both options use product video, they serve different purposes.
Option 1: Photos + Video + Thumbnail
The first option combines traditional marketplace photos with video.
You can add up to six product photos and also upload a video. The listing can therefore contain the photo gallery, the product video and its thumbnail together.
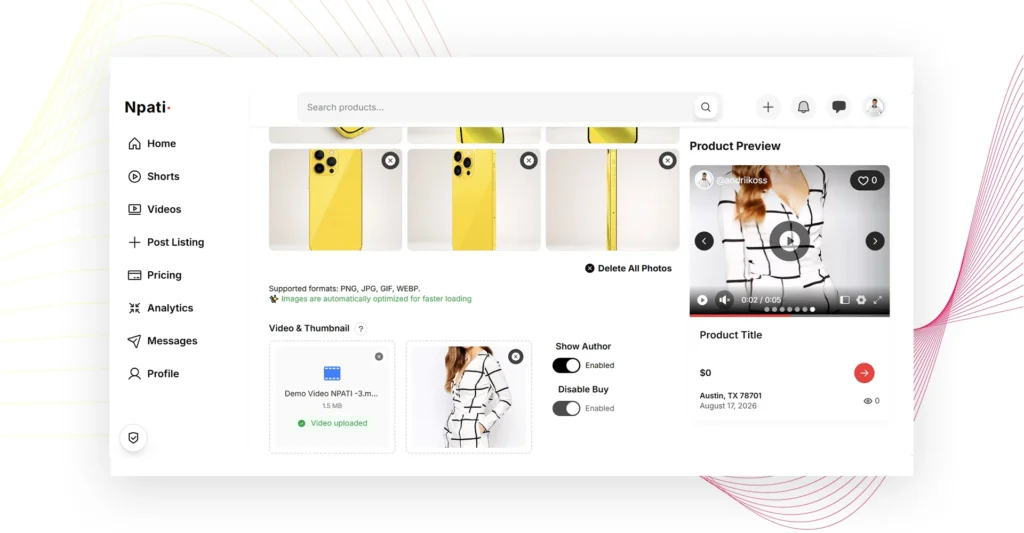
This format works well when buyers may want to study individual details before or after watching the video.
For example, imagine that you are selling an iPhone.
Photos can show the front, back, camera system, side edges, accessories and a close view of any cosmetic wear. Meanwhile, the video can demonstrate that the phone turns on, show the screen working and provide a smooth view around the entire device.
As a result, the two media formats perform different jobs.
A buyer can pause on photos when inspecting a specific detail. At the same time, video provides movement, context and a more continuous view of the product.
If you want help creating the photo portion of the listing, read How to Add Photos to a Npati Listing.
When Should You Use Photos + Video?
Consider this format when photos contain important details that people may want to inspect closely.
Electronics are a good example. A laptop can be photographed from several angles while the video demonstrates startup, display quality and general operation.
Similarly, vehicle photos can document the exterior, interior, wheels and condition. The video can then provide a walkaround or show the vehicle running.
Furniture can also benefit from both formats. Individual images make it easier to inspect material, corners and surface condition, while a video helps communicate overall proportions and appearance.
Therefore, photos and video should not simply repeat each other. Instead, each format should add useful information to the same listing.
Option 2: Video Focused Listing
The second option is the Video Focused Listing.
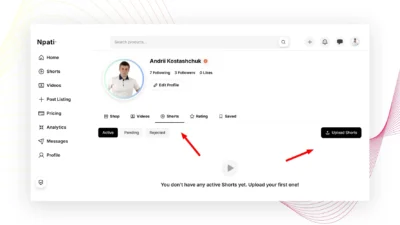
With this mode, you can create a listing using video without uploading the six standard product photos. Once the video is uploaded, Npati automatically creates a thumbnail from it.
The visual presentation also changes.
In Video Focused mode, the video based card can appear larger and place more visual emphasis on the video.
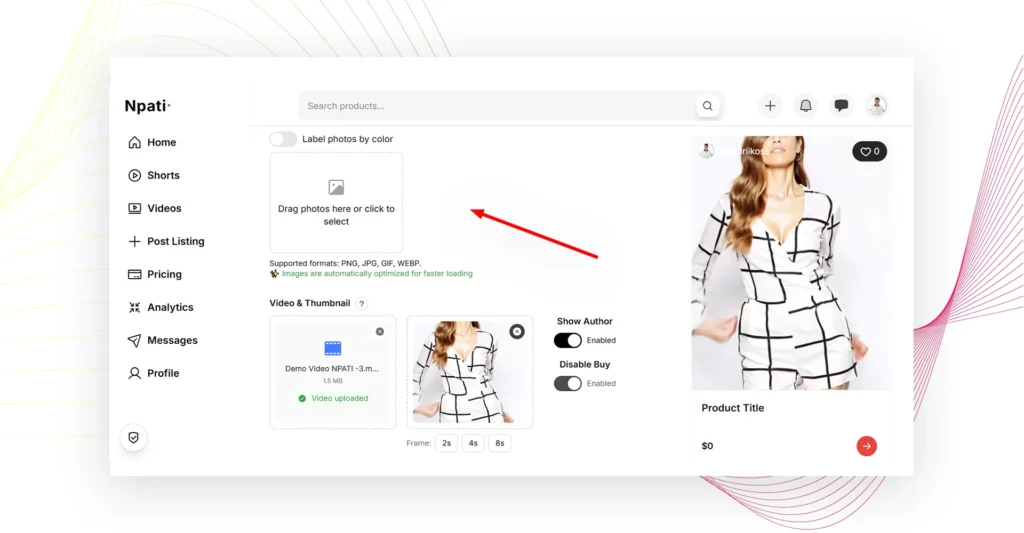
Consequently, this option can be useful when movement or demonstration is the main way you want people to discover the item.
Instead of a traditional photo first marketplace presentation, video becomes the main visual element.
When Should You Use a Video Focused Listing?
Video Focused Listing can work particularly well when the product is easier to understand in motion.
For example, an electronic device can be shown operating from start to finish. A vehicle can be presented through a walkaround video. Clothing can be shown while moving, and machinery can be demonstrated while running.
Likewise, a unique item may have features that are difficult to communicate through several separate photographs.
In those situations, making video the primary visual format can create a clearer presentation.
However, the written listing information still matters. A Video Focused Listing should have an accurate title, category, description, price, condition and other relevant fields.
Video supports the listing. It does not replace accurate product information.
Photos + Video vs. Video Focused Listing
The main difference is straightforward.
With Photos + Video + Thumbnail, buyers receive a traditional photo gallery together with video.
By contrast, a Video Focused Listing does not require the six standard product photos. Instead, video becomes the primary visual content, and the video based card can appear larger.
Choose the first format when detailed still images are important.
Choose the second format when motion, demonstration or a larger video presentation communicates the product more effectively.
You can see the complete explanation of all listing presentation formats in How to Create a Listing on Npati.
Step 4: Let Npati Create the Video Thumbnail
After your video is processed, Npati automatically creates a thumbnail.
Therefore, you do not always need to prepare a separate image before uploading your video.
The thumbnail is important because it represents the video before someone starts watching it.
A useful thumbnail should show the product clearly. Ideally, the item should be easy to recognize even at a smaller card size.
If the automatically generated frame works well, you can keep it.
However, you have additional options when another moment in the video would represent the product better.
Step 5: Choose Another Video Frame
Npati can let you select another frame from your uploaded video.
Depending on the processed video, you may see options such as 2s, 4s and 8s. You can select the frame that gives buyers the clearest view of the product.
For example, the automatic thumbnail may capture the beginning of the video while the camera is still moving.
In that case, the four second frame might show a much clearer view.
Similarly, an eight second frame could work better if the product is fully visible later in the recording.
Review the available frames instead of accepting the first one automatically.
Step 6: Upload Your Own Thumbnail When Needed
You can also upload your own thumbnail if the automatically generated options do not represent the video well.
A custom thumbnail can be useful when you already have a clear product image that accurately represents what appears in the video.
Nevertheless, keep the thumbnail realistic.
Avoid creating an image that makes the product appear different from the actual item. In addition, do not hide visible damage or show accessories that are not part of the offer.
The goal is to make the video easy to understand before playback begins.
What Should a Good Product Video Show?
A marketplace product video should answer questions that are difficult to answer with text alone.
Begin by showing the complete item clearly. Afterward, move around the product so viewers can understand its shape, size and condition.
Important details should receive enough screen time to be visible.
For a used item, show scratches, dents, stains or other condition details honestly. Meanwhile, products with moving or electronic components can be demonstrated while operating.
Finally, make sure the product shown in the video matches the product described in your title, photos and written description.
Consistency makes the complete listing easier to understand.
How to Record a Product Video With Your Phone
You do not necessarily need professional video equipment.
A modern smartphone can be enough for many marketplace product videos.
Before recording, clean the camera lens and make sure the product is well lit. Then hold the phone steadily or place it on a stable surface.
Move slowly when showing different sides of the item.
Fast camera movement can make important details difficult to inspect. Therefore, give viewers enough time to understand what they are seeing.
Natural daylight can work well. However, avoid strong reflections when recording screens, glossy furniture or polished vehicle surfaces.
Most importantly, check the recording before uploading it.
Product Video Example: Smartphone
Suppose you are selling a used iPhone.
Start with a clear view of the entire phone. Next, show the front display, back panel, camera area and side edges.
After that, turn on the device and demonstrate that the screen works.
If there is cosmetic damage, move closer so the viewer can see it.
You can also show included accessories such as a charging cable or case, provided those items are actually included in the sale.
In this example, photos could provide detailed close views while video demonstrates the phone working.
Alternatively, a strong product demonstration could be used as the main visual element in a Video Focused Listing.
Product Video Example: Car or Vehicle
A vehicle video can begin with a slow exterior walkaround.
Next, show important areas such as the wheels, body condition and interior.
If appropriate, the recording can also demonstrate the engine running.
However, avoid moving the camera too quickly from one part of the vehicle to another.
A steady walkthrough makes it easier for viewers to understand the overall condition.
Photos can still be useful for detailed inspection. On the other hand, Video Focused mode may work well when the walkaround itself is the central part of the listing.
Product Video Example: Furniture
Furniture can be difficult to understand from one angle.
Begin with the complete item. Then move slowly around it so viewers can see the front, sides and back where relevant.
Close views can show fabric texture, wood surfaces, handles or visible wear.
In addition, video can help communicate scale and proportions better than a single image.
Still photos can then provide closer inspection of important areas.
Product Video Example: Clothing and Shoes
Video can show movement, material and shape in ways that static images cannot.
For clothing, show the complete item first. Afterward, move closer to the fabric and important design details.
Shoes can be rotated so viewers see the front, sides, back and soles.
If there is visible wear, show it directly.
As with other categories, the video should accurately represent the actual item being offered.
Show the Real Condition of Used Products
Honest condition information is important when selling used items.
Do not use camera angles specifically to hide scratches, dents or other known defects.
Instead, show important condition details and explain them in your written description.
For example, if a laptop has a scratch near one corner, show that area in the video and mention the scratch in the listing description.
As a result, your text, photos and video communicate the same information.
For more guidance on writing clear condition details, see How to Write a Better Npati Listing.
Keep the Background Simple
The product should remain the main subject of the video.
Before recording, remove unrelated objects when possible.
A simple room, table or neutral area can work well for smaller products.
Meanwhile, vehicles and larger items should be recorded somewhere that allows the camera to move around them safely and clearly.
You do not need a professional studio.
Instead, prioritize visibility, accurate color and a clear view of the item.
Use Enough Light
Good lighting helps buyers see product details.
For indoor videos, daylight from a nearby window can provide soft illumination. Artificial room lighting can also work when the product remains easy to see.
However, very dark footage can hide condition details.
Bright reflections may create a different problem, especially on smartphone displays, laptop screens, glass or polished surfaces.
Therefore, test a few camera positions before recording the complete video.
Do Not Make the Video Misleading
Product videos should represent the item accurately.
Avoid editing out visible damage, changing the apparent product color or presenting accessories as included when they are not part of the sale.
Similarly, do not use a thumbnail that shows a different product.
Clear marketplace content helps buyers understand what they are considering before they send a message.
Consequently, accuracy should take priority over making every frame look perfect.
Match Your Video With Your Npati Description
Your product video should support the information already present in the listing.
For instance, a title such as Apple iPhone 14 Pro 128GB Midnight identifies the item clearly.
The description can then explain storage, condition, included accessories and other relevant information.
Meanwhile, the video can show the actual phone and demonstrate its condition or operation.
Together, those elements create a more complete listing than any one format could provide alone.
If you need help improving your title and description, read How to Write a Better Npati Listing.
Should You Add Photos if You Already Have Video?
It depends on the item and the way you want the listing to appear.
For products with small details, photos can make inspection easier. Buyers can stop on one image and study a particular area without pausing the video.
Therefore, Photos + Video + Thumbnail can be useful for electronics, vehicles, furniture and many used products.
However, a Video Focused Listing may be a better presentation when movement or demonstration is central to the item.
Npati gives you both options so you can choose the format that best fits your listing.
For a detailed guide to the photo side of the process, visit How to Add Photos to a Npati Listing.
Review Your Video Before Publishing
Before you create the listing, watch the uploaded video from beginning to end.
Confirm that the correct product is shown and that important details are visible.
Next, review the thumbnail and replace it if another frame represents the video better.
Afterward, check the rest of the listing.
Make sure your title, category, product description, price, condition, address, contact information and tags are accurate.
If you are using photos as well, confirm that the photos and video show the same product.
Finally, preview the listing as a buyer would see it.
Frequently Asked Questions About Npati Product Videos
Can I add video to a Npati listing?
Yes. Npati allows product video to be added to marketplace listings.
What is the maximum Npati listing video size?
Npati currently allows a listing video upload of up to 2 GB.
Can I use photos and video in the same Npati listing?
Yes. You can combine up to six product photos with a product video and thumbnail.
Can I create a Npati listing with only video?
Yes. Use the Video Focused Listing format when you want to create the listing around video without adding the six standard product photos.
What is a Video Focused Listing on Npati?
A Video Focused Listing uses video as the primary visual content instead of the standard product photo gallery. In this mode, the video based card can appear larger and give the video more visual emphasis.
Does Npati automatically create a video thumbnail?
Yes. Npati can automatically create a thumbnail after your video is uploaded and processed.
Can I change the automatically generated thumbnail?
Yes. You may be able to select another frame, including options around 2, 4 or 8 seconds, depending on the processed video.
Can I upload my own video thumbnail?
Yes. If the generated frames are not suitable, you can upload your own thumbnail.
Is Photos + Video better than a Video Focused Listing?
Neither format is automatically better for every item. Photos + Video can work well when buyers need detailed still images, while Video Focused Listing can be useful when movement or demonstration is the most important visual information.
Should my product video show damage?
Yes, when damage is part of the actual condition of a used item. Showing visible wear and describing it accurately can make the listing clearer for buyers.
Do I still need a product description if I use a video?
Yes. Video should complement accurate listing information rather than replace it. Include a useful title, description, condition, pricing and other fields relevant to the product.
Continue With the Npati Seller Guides
Product video is one part of building a complete Npati marketplace listing.
If you are new to the platform, start with How to Create a Npati Account. Next, set up your Npati profile and add an address to your Npati account.
When your account is ready, follow How to Create a Listing on Npati for the complete listing process.
For product photography, continue with How to Add Photos to a Npati Listing.
You can also use How to Write a Better Npati Listing to improve your title, description, condition information, pricing and overall presentation.
Finally, visit Npati Guides for more step by step tutorials about using the Npati marketplace.
Add Product Video to Your Next Npati Listing
Video gives sellers another way to explain a product visually.
Choose Photos + Video + Thumbnail when you want detailed product images together with a demonstration.
Alternatively, use Video Focused Listing when video should be the main visual experience and you want the video based card to receive more emphasis.
After uploading your video, review the automatically generated thumbnail and choose a better frame when necessary.
Most importantly, make sure your video accurately represents the product.
When the title, description, photos, video and condition information all tell the same clear story, buyers can understand your Npati listing more easily.